Tuesday, April 05, 2011

Daring Bakers Challange March 2011 - Meringue Coffee Cake

The March 2011 Daring Baker’s Challenge was hosted by Ria of Ria’s Collection and Jamie of Life’s a Feast. Ria and Jamie challenged The Daring Bakers to bake a yeasted Meringue Coffee Cake.

Now this kind of challenge is right up my alley. I LOVE making bready stuff. There's something about the kneading and how it changes consistency and then it rises and it's like magic and then there's the smell.... *sigh* I could go on and on...

I figured that two massive wheels of this would be too hard to share out to people so I decided to make a wheel with half of it and treat the rest like chelsea buns.
The dough as I put it aside to rise.

The dough once it was risen.

 
The fillings all ready to go.

 Dough rolled out and meringue ready to go.

 meringue spread out

Topping in place and rolling started. I went for the traditional chocolate, pecans and cinnamon-sugar.

 I can't resist a macro shot and it all looks so pretty!

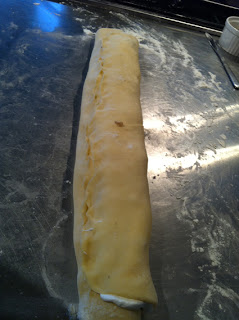
Dough rolled up.

I rolled my dough onto baking paper and a flexible cutting board.

Ring closed up.

I cut with kitchen scissors.

The finished result. It was flatter than I'd expected and I think it was in about 5 mins too long but it still looks good (I think).

For the chelsea bun versions I cut the log into sections with a knife.

I greased and floured muffin tins and put the segments in in various ways.

The buns after the second rise.

Another gratuitous macro shot.

And this is one of the buns cut in half. Yummo!

And this is a segement from the wheel. The texture, although a little dry (must watch the clock!) was really great and something new for me. I will definitely be trying this recipe again with variations in filling. It was a great hit with everyone who tried it and I have requests for Easter.

The Return to Daring Baking

The February 2011 Daring Bakers’ challenge was hosted by Mallory from A Sofa in the Kitchen. She chose to challenge everyone to make Panna Cotta from a Giada De Laurentiis recipe and Nestle Florentine Cookies.

Well I have had quite a while off from Daring Baking- the easiest way to word my hiatus is to say that life got in the way. And when I finally returned, what did I get? Panna Cotta. Oh dear.

I'm vegetarian so have stayed away from anything with gelatine in it and have also bloused out from gelatine substitutes but my pride wouldn't let me take a pass on my first month back the the bakers so I just had to do it and I must say, I think it was a bit of a fail. Don't get me wrong, the flavour was great and the texture was smooth and creamy but, due to insufficient experimentation with galtin substitutes, my panna cotta, although firm, would not hold its own shape. Consequently, I got all snitty and didn't take as good photos as I could have.

The florentine went better but took a bit of experimentation to find just the right amount of time to cook them so they were an relatively even brown and not just brown at the edges (I was worried about them burning) because if they don't brown all the way across the buscuit, all you have a floppy florentines.

So. The panna cottta. I made a vanilla one with a mixed berry gelee and used Xanthan Gum instead of gelatine because I am vegetarian.

This was my great innovative presentation idea which failed abysmally. I put shot glasses inside poaching cups and poured the panna cotta around it. The intention was to pull the shots glasses out once the panna cotta had set and put in the berry gelee. Unfortunately my panna cotta didn't set enough so when I pulled the shot glass out, it all just kinda slopped in on itself. Very demoralising.

And so I pinned all my hopes on the florentines. These turned out to be trickier than I had expected. I'm glad the mixture makes to many because it took me several goes to work out exactly how long they had to cook to set properly. It seems it really is very important that they are brown all the way through but it's a fine line between that and burning. The ones below are an example of my first ones- these aren't cooked enough to set properly.


This is what they had to look like to set properly.

I draped some over a rolling pin to curve them.
Curved Florentines drizzled with dark chocoalte.

Flat versions also covered in dark chocolate. These are amazingly addictive!

Tuesday, June 02, 2009

Daring Bakers Challange #2- Apple Strudel

The May Daring Bakers’ challenge was hosted by Linda of make life sweeter! and Courtney of Coco Cooks. They chose Apple Strudel from the recipe book Kaffeehaus: Exquisite Desserts from the Classic Cafés of Vienna, Budapest and Prague by Rick Rodgers.

Okay so I'm so way late with this post that I don't know if it even counts for this month but goddamnit, I made the strudel and I'm gonna blog it. I seriously need to start these challenges earlier in the month though to give myself the time to go to town on them like some other Daring Bakers do. I am put to shame.


As it was, once started, this was rather fun. I did two batches of the pastry as instructed (see below) and my second one was definitely better than the first. After rolling the pastry as thin as I could and doing some gentle pulling it out by stretching it over my forearms, I finished it off by gently tipping the pastry over the edge of the table and let gravity do the work of thinning it out as it hung and I then pulled/rolled it (the tablecloth) back over the table edge. Then I just had to thin the edges out by hand. I thought I had way too much filling for one strudel (maybe my pastry wasn't big enough) and when the pastry came out of the oven, the top layer seemed too solid to me which would seem to indicate that it was too thick but once cooled this didn't seem to be an issue. Since reading this Daring Baker's entry, I think my problem may have partially been not using clarified butter so I'll have to try this again at some point. That said, it did taste good and a large portion of it was inhaled by my flatmate as soon as it came out of the oven.

Another Daring Baker whose challenges I regularly check is Tartlette. Between the stunning photography and innovative twists on challenges, I know I'm going to be torn between awe, inspiration and horrible envy.

Preparation time
Total: 2 hours 15 minutes – 3 hours 30 minutes

15-20 min to make dough
30-90 min to let dough rest/to prepare the filling
20-30 min to roll out and stretch dough
10 min to fill and roll dough
30 min to bake
30 min to cool

Apple strudel
from “Kaffeehaus – Exquisite Desserts from the Classic Cafés of Vienna, Budapest and Prague” by Rick Rodgers

2 tablespoons (30 ml) golden rum
3 tablespoons (45 ml) raisins
1/4 teaspoon ground cinnamon
1/3 cup plus 1 tablespoon (80 g) sugar
1/2 cup (1 stick / 115 g) unsalted butter, melted, divided
1 1/2 cups (350 ml) fresh bread crumbs
strudel dough (recipe below)
1/2 cup (120 ml, about 60 g) coarsely chopped walnuts
2 pounds (900 g) tart cooking apples, peeled, cored and cut into ¼ inch-thick slices (use apples that hold their shape during baking)

1. Mix the rum and raisins in a bowl. Mix the cinnamon and sugar in another bowl.

2. Heat 3 tablespoons of the butter in a large skillet over medium-high. Add the breadcrumbs and cook whilst stirring until golden and toasted. This will take about 3 minutes. Let it cool completely.

3. Put the rack in the upper third of the oven and preheat the oven to 400°F (200°C). Line a large baking sheet with baking paper (parchment paper). Make the strudel dough as described below. Spread about 3 tablespoons of the remaining melted butter over the dough using your hands (a bristle brush could tear the dough, you could use a special feather pastry brush instead of your hands). Sprinkle the buttered dough with the bread crumbs. Spread the walnuts about 3 inches (8 cm) from the short edge of the dough in a 6-inch-(15cm)-wide strip. Mix the apples with the raisins (including the rum), and the cinnamon sugar. Spread the mixture over the walnuts.

4. Fold the short end of the dough onto the filling. Lift the tablecloth at the short end of the dough so that the strudel rolls onto itself. Transfer the strudel to the prepared baking sheet by lifting it. Curve it into a horseshoe to fit. Tuck the ends under the strudel. Brush the top with the remaining melted butter.

5. Bake the strudel for about 30 minutes or until it is deep golden brown. Cool for at least 30 minutes before slicing. Use a serrated knife and serve either warm or at room temperature. It is best on the day it is baked.

Strudel dough
from “Kaffeehaus – Exquisite Desserts from the Classic Cafés of Vienna, Budapest and Prague” by Rick Rodgers

1 1/3 cups (200 g) unbleached flour
1/8 teaspoon salt
7 tablespoons (105 ml) water, plus more if needed
2 tablespoons (30 ml) vegetable oil, plus additional for coating the dough
1/2 teaspoon cider vinegar

1. Combine the flour and salt in a stand-mixer fitted with the paddle attachment. Mix the water, oil and vinegar in a measuring cup. Add the water/oil mixture to the flour with the mixer on low speed. You will get a soft dough. Make sure it is not too dry, add a little more water if necessary.
Take the dough out of the mixer. Change to the dough hook. Put the dough ball back in the mixer. Let the dough knead on medium until you get a soft dough ball with a somewhat rough surface.

2. Take the dough out of the mixer and continue kneading by hand on an unfloured work surface. Knead for about 2 minutes. Pick up the dough and throw it down hard onto your working surface occasionally.
Shape the dough into a ball and transfer it to a plate. Oil the top of the dough ball lightly. Cover the ball tightly with plastic wrap. Allow to stand for 30-90 minutes (longer is better).

3. It would be best if you have a work area that you can walk around on all sides like a 36 inch (90 cm) round table or a work surface of 23 x 38 inches (60 x 100 cm). Cover your working area with table cloth, dust it with flour and rub it into the fabric. Put your dough ball in the middle and roll it out as much as you can.
Pick the dough up by holding it by an edge. This way the weight of the dough and gravity can help stretching it as it hangs. Using the back of your hands to gently stretch and pull the dough. You can use your forearms to support it.

4. The dough will become too large to hold. Put it on your work surface. Leave the thicker edge of the dough to hang over the edge of the table. Place your hands underneath the dough and stretch and pull the dough thinner using the backs of your hands. Stretch and pull the dough until it's about 2 feet (60 cm) wide and 3 feet (90 cm) long, it will be tissue-thin by this time. Cut away the thick dough around the edges with scissors. The dough is now ready to be filled.

Tips
- Ingredients are cheap so we would recommend making a double batch of the dough, that way you can practice the pulling and stretching of the dough with the first batch and if it doesn't come out like it should you can use the second batch to give it another try;
- The tablecloth can be cotton or polyster;
- Before pulling and stretching the dough, remove your jewelry from hands and wrists, and wear short-sleeves;
- To make it easier to pull the dough, you can use your hip to secure the dough against the edge of the table;
- Few small holes in the dough is not a problem as the dough will be rolled, making (most of) the holes invisible.

Thursday, May 21, 2009

I am Aynia's unventable spleen

It's a paradox. I have this blog which is a public forum and when something goes wrong, I like the idea that I can vent my spleen into the publicity of cyberspace and someone reads my rant and commiserates or laughs and even if they never comment to let me know, I still know that surely someone out there must have felt that way too. But this is a public forum and as such, one can't really properly vent one's spleen about certain things. Like certain clients one might have. I use two things to gauge my rants- (1) would I say it to their face (2) will it damage my business if this opinion is made public? If I wouldn't say it to their face, I sure as hell shouldn't write it behind their back and ship it off into cyberspace. I may have several hypocritical niggles in my persona but that facet ain't one of them. I guess it's because if someone's pissed off at me, I'd like to think they have the balls to say it to my face instead of mouthing off behind my back. As for (2), well that's just common sense.

But on to happier things, these Passionfruit Melting Moments are next on my baking hitlist. Mmmmmmmmmmm, passionfruit.

Thursday, May 14, 2009

One Silly Ball

I don't know if I've written you guys a list yet of the many things I find funny about Australia. The wildlife rates up there pretty highly. They have birds that sound like monkeys, lizards that sound like birds and several species that look like leftover bits of many other animals all stuck together.

And the Aussies themselves are a constant source of amusement for me. On the whole they're very friendly and I've never met chattier shop people in my life and whereas I find it amusing that they seem to be able to shazza dazza just about anyone's name (and if they can't, they slap an "-o" on the end) but I thought my name was safe.

Apparently I was wrong.

In the absence of being able to 'azza' or 'o' me, at least two Aussies here (and that's two more people than have dared ever before in my life) have decided to shorten me to one sillyball (I've been thinking of BlackAdder recently). It's done so off-the-cuff and unexpectedly that I'm left blinking to myself going, "Did they just call me Aan?!" Because that's what it sounds like when you leave off the rest of my name. And you know what? I don't think I mind.* I never had a nickname growing up, my sister is the only one who has ever got away with shortening my name, so something supposedly as minor as this is rather novel for me. But seriously- only the Aussies mate, only the Aussies would try this.

And since I'm on the topic of Aussies and language, I feel the need to bring up something which really cracks me up and this is their use of the word shit.
That really shits me.
I cracked the shits.
It's shitting me to tears.

The last is my personal favourite and makes me giggle almost as much as when I first heard a Brit say, "It all went tits-up."

*Don't you go getting any ideas though. I'm quite happy with everyone using my name in full. More than quite happy.

Thursday, April 30, 2009

Apple glory

I haven't check up on Mac vs PC ads for ages and oh the hilarity that has ensued this afternoon. Excuse the crap quality of my embedded YouTube vids but I had to share a couple of my favs. Check out the Apple site for the complete archive.

Incidentally, I did not know about that new face recognition software on iPhoto and I actually went, "Holy crap!" out loud when I heard that. That is so cool and so handy. I am in awe.

geek niche

"Comic Sans walks into a bar, bartender says, 'We don't serve your type.'"

Tuesday, April 28, 2009

Daring Bakers' Challenge #1- cheesecake


The April 2009 challenge is hosted by Jenny from Jenny Bakes. She has chosen Abbey's Infamous Cheesecake as the challenge.

Abbey's Infamous Cheesecake

crust
2 cups / 180 g graham cracker crumbs
1 stick / 4 oz butter, melted
2 tbsp. / 24 g sugar
1 tsp. vanilla extract

cheesecake
3 sticks of cream cheese, 8 oz each (total of 24 oz) room temperature
1 cup / 210 g sugar
3 large eggs
1 cup / 8 oz heavy cream
1 tbsp. lemon juice
1 tbsp. vanilla extract (or the innards of a vanilla bean)
1 tbsp liqueur, optional, but choose what will work well with your cheesecake

DIRECTIONS
1. Preheat oven to 350 degrees F (Gas Mark 4 = 180C = Moderate heat). Begin to boil a large pot of water for the water bath.

2. Mix together the crust ingredients and press into your preferred pan. You can press the crust just into the bottom, or up the sides of the pan too - baker's choice. Set crust aside.

3. Combine cream cheese and sugar in the bowl of a stand-mixer (or in a large bowl if using a hand-mixer) and cream together until smooth. Add eggs, one at a time, fully incorporating each before adding the next. Make sure to scrape down the bowl in between each egg. Add heavy cream, vanilla, lemon juice, and alcohol and blend until smooth and creamy.

4. Pour batter into prepared crust and tap the pan on the counter a few times to bring all air bubbles to the surface. Place pan into a larger pan and pour boiling water into the larger pan until halfway up the side of the cheesecake pan. If cheesecake pan is not airtight, cover bottom securely with foil before adding water.

5. Bake 45 to 55 minutes, until it is almost done - this can be hard to judge, but you're looking for the cake to hold together, but still have a lot of jiggle to it in the center. You don't want it to be completely firm at this stage. Close the oven door, turn the heat off, and let rest in the cooling oven for one hour. This lets the cake finish cooking and cool down gently enough so that it won't crack on the top. After one hour, remove cheesecake from oven and lift carefully out of water bath. Let it finish cooling on the counter, and then cover and put in the fridge to chill. Once fully chilled, it is ready to serve.

Pan note: The creator of this recipe used to use a springform pan, but no matter how well she wrapped the thing in tin foil, water would always seep in and make the crust soggy. Now she uses one of those 1-use foil "casserole" shaped pans from the grocery store. They're 8 or 9 inches wide and really deep, and best of all, water-tight. When it comes time to serve, just cut the foil away.

Prep notes: While the actual making of this cheesecake is a minimal time commitment, it does need to bake for almost an hour, cool in the oven for an hour, and chill overnight before it is served. Please plan accordingly!


This was my first Daring Bakers Challenge and I wish I had had more time to do something superfancy. There also wasn't any specific occasion to bake for, which in my mind can make choosing the variation an easier job. I therefore decided to stay fairly plain and went citrus. To the basic recipe I added finely grated rind of two lemons and one orange. For the topping I caramelized (kinda) finely sliced orange with some sugar, rum and some lemon juice.

I wanted to do some mini ones so roughly guessed amounts and spread out the base between eight cupcake paper cups and put the rest in a foil-lined small round casserole sigh we had. (I lined it with foil so that I could pull it out of the dish later). Of course the small ones cooked sooner than the large one so I couldn't cool them in the oven. Thank goodness it's warm in Brisbane! Also with this many things in the oven, I couldn't do a proper water bath so just put a pan in the bottom of the oven. It worked a charm- no cracks. This recipe is amazingly forgiving. The larger cheesecake ended up being quite deep so I was worried it wouldn't cook properly in the middle. As soon as it started browning on top, I covered it lightly in foil and that did the trick.

I will without a doubt be making this recipe again. In fact I'm pretty sure it's my new permanent always-use-it-cheesecake-recipe. I really want to try out variations that have been posted by other bakers.

Thursday, April 23, 2009

Tea for two. Or more.

I've seen this mug before and can't remember if I've blogged about it but I'd been talking about the need for a Pantone colour tea cup for ages before I saw this. It's comforting to see someone else saw the need...


No explanation needed really. I do have one objection though, the link to this mug is on the website boystomengifts.com. I BEG YOUR PARDON?!!!! Do only men want cool and quirky office-esque gifts? I know many women who would find this a cool gift. Hmpf.


Oh the number of times this could have saved my bacon! Although I got very proud at being able to hold 4 mugs in one go and not spill a drop or burn my knuckles.


The only problem I can see with this mug is that it will only hold 2 biscuits. Maybe three at a squeeze but they'd have to be thin. Otherwise I think it's simply ingenious. I'd want one, that's for sure.


This isn't really a mug that will make drinking easier in any way but I worked with photographers for a while and as a themed mug, I reckon this is one of the better ones I've seen.


Here is the link to the page where I found these. Follow it to see more interesting designs and also further links to info about the cups, how there were designed, where to buy them etc. I'm just sticking to the pretty pictures for now.